
Summer Starts Here - Save up to 70%


6-5/16" Round. Tall amber beacon light has 1 flash pattern to alert motorists and pedestrians to your vehicle. Multiple mounting options. 3-Wire design.
Features:
Specs:
Videos are provided as a guide only. Refer to manufacturer installation instructions and specs for complete information.
Collin: Hey everyone. It's Collin here at etrailer and today we're going to take a look at the Buyers Products six and a quarter inch amber strobe warning light. And this is going to be a beacon style strobe light. You can see it gives off a nice, bright strobe that's going to just alert people around you. Whether you're on the construction site, roadwork, maybe even a mining situation, just going to notify people that you are currently pulled off the road and working. So they know to steer clear, make sure to avoid any confrontation or any accidents.
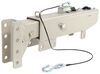
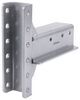
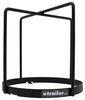
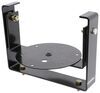
Now, this is going to be a halogen strobe light. You can see it gives off two bright flashes every second or so. It's also going to be a permanent mount, so you're going to need to either mount it to the roof of your vehicle with the included hardware, or, if you don't want to permanently mount it or drill into the rooftop of your vehicle, you can go the route like what we're doing.We have the Buyers Kabgard and then we also have the Buyers beacon light bracket right here attached to it. So we can get it mounted right here and then hardwired to our vehicle. This is going to be a very durable light that's going to serve your needs very well.
It's got a nice plastic housing to it. It's going to be very robust and provide you a lot of years of service. The included hardware provides us with great connection points along with our base. One thing I do want to point out, it's not my favorite thing. You can hear that chirping noise that comes every time the bulb lights up.
That's not necessarily a warning sound, it's just something the halogen bulb does every time it lights up. It may bother you, it may not. I just wanted to let you know. We're also going to have six and a quarter inches on our height as well as six and a quarter inches on our diameter at the base as well.When working with customers, they often ask, "Is this going to be compliant with this regulation or this regulation" So just to give you a heads up, it is going to be SAEJ845 class two certified. So that should let you know if that's going to serve your needs or not.
If it does meet those certifications, this is going to be a perfect solution for you. Now, with this being a permanent mount, it is going to be best suited for those vehicles that are full-time work vehicles, that you're going to be constantly using it for work. If you're looking for something for more occasional use, there are other options available. We have some here on our website that have magnetic mounts. It just hooks up to your 12 volt outlet so you can just stick it on your roof while you're on the job.When you're done, you're headed home or going to drive around for the weekend, you can remove it and then store it in your truck. This is going to be a two wire setup, so all we need is a ground and a power wire run up to our light, generally from a switch inside the vehicle. Let's take a look at that process now. Now, to begin your install, you do want to pick a spot that you want to mount it, whether it's on the cab of your vehicle. In our case, we're going to mount it to the beacon light bracket that's attached to our cab rack. Now, we're just going to feed our wire because it's coming out of the center of our light. We'll feed it through that center hole and then we're going to have those three different bolts. So we're going to line those up the three slots on the outsides. And then we'll just take the included hardware right here and drop them through our light and through the slots of our bracket.And now the only piece of hardware we're going to be using that does not come in our kit is a large flat washer. And that's just simply because we have a long slot right here, just to provide a better connection point. So we'll just slide that washer up, and then our lock washer, and then the nuts. And I'm just going to use my hands to tighten it all the way down, as far as I can get it. Then I'll repeat this for the other two bolts as well. Now, once you have all three of them as tight as you can get them with your hands, just going to grab a Phillips head screwdriver for the top and then an L8 millimeter socket for the bottom so we can tighten it down.It doesn't have to be over tightened, you just get it pretty snug and you'll be good to go. When you're done, just give it a good shake. And you see that the entire rack is moving, so we can move on. Now, when it comes time to wire up your light, like we talked about, it's going to be a two wire system. We've got our power, our red cord, and we're also going to have our black, which is our ground. Just going to get it hooked up to our existing switch that's in the cab of our pickup. If you don't have an existing switch, that's probably going to be the easiest way to go about it. You can pick one of those up here at etrailer. We've got plenty of options. Now, these are going to come pre-stripped. They did leave a little too much of exposed wire for my liking, so I'm just going to go ahead and snip a little bit of it off for both of them. There we go. Now, what I'm going to do is go ahead and twist them up, make them real nice and tight.And then with one at a time, start with our power, grab our heat shrink bud connector, feed that through. And then we'll just take a pair of crimps. Don't be afraid to really squeeze down on it. I like to, once I get ahold of it, take my other hand and get two hands on the handle. Just really give it a good squeeze. How to ensure you crimped down on it tight Just go ahead and give it a tug. See it's not coming off, so we can move and do the same thing for our ground. Now we're connected to the wires from our switch. Be sure to disconnect any power so you don't have any shorts. Just going to take our ground first. We've already twisted it up nice and tight, so we'll just feed that into our butt connector. Take the crimp. Again, don't be afraid to use two hands so you can get a nice crimping on our wire. Again, just give it a nice tug. You see it's good. Repeat this for the power wire.Now, you do want to confirm that you got good connections on both of them. From there, we're just going to grab our heat gun and we're just going to shrink those down. And then once we have this completed, we'll just go ahead and tidy up our wiring. Now, what I like to do is just get some wire loom over my exposed wires right here. First, I'm going to start by wrapping some electrical tape around our wire right there. I'll just let that hang for a second and grab my wire loom and get it around my wire. I'm going to bring it up to where my tape is and I'm going to feed the split point between, and get the tape into this split point right there, and then continue wrap.Once you got a good seal, rip off the tape. And then I'm going to continue to feed that wire through the loom all the way until I get to my butt connectors. From there, I'm just going to go ahead and from the loom. Go back to my electrical tape and then I'm just going to use electrical tape the rest of the way over my butt connectors. And then go all the way to where my electrical tape is wrapped around the wires from my switch. Now, from here, now that got everything wired up, we can go ahead and go to our switch and give it some power and make sure that everything is working properly. Now, with everything working properly, we can stay in compliance with any job requirements or local laws. Well, that's going to do it for our look at the Buyers six and a quarter inch amber strobe warning light.
Info for this part was:
At etrailer.com we provide the best information available about the products we sell. We take the quality of our information seriously so that you can get the right part the first time. Let us know if anything is missing or if you have any questions.


Thank you! Your comment has been submitted successfully. You should be able to view your question/comment here within a few days.
Error submitting comment. Please try again momentarily.